Hugo blog on gh-pages with terraform and AWS Route 53
This is a self-referential post about deploying a personal blog on github pages. It describes how kudulab.io is deployed, starting from scratch, ending with fully-working website deployed using best practices.
All of the supporting code is hosted on github, just like all the open source tools used.
Audience
This post will be most useful to someone building a personal website with similar technologies. You may still find some pieces useful if you
- want to deploy a static site to github pages
- are making first steps with terraform
- are learning to use the AWS Route 53 DNS via terraform AWS provider
The requirement
We are faced with the following requirement:
- Build a website where content (posts and static pages) can be managed with markdown.
- Content should be versioned in git, not served from database.
git pushshould be sufficient to make modifications to the website. (aka push to deploy) - Allow the blog visitors to place comments under posts
- Add web traffic monitoring
- Site should be public, hosted on custom domain
- Serve the site only over
https - The deployment must be fully automated.
- All operations, infrastructure and development environment must be declared and versioned in code.
- Keep the hosting costs low
Choosing the right technologies
There are plenty of available solutions to meet above requirement. This is just one combination which we found to be acceptable. The solution goes like this:
- We use Hugo - a static site generator to generate a static page.
- The static web page is hosted by Github Pages. A personal blog’s traffic should be well within the github pages limits. Github pages supports custom domains and generating https certificates with Let’s Encrypt.
- Since static pages cannot have dynamic content served by the same host, we need an external solution - we found Disqus offers a free plan for personal usage. It is also well integrated with hugo.
- For web traffic monitoring we use google analytics. Which is also well integrated with hugo
- To setup custom domain and manage the DNS records as code, we use Terraform and AWS Route 53 DNS
- To define operations as code we use bash scripts
- To define a sufficient execution environment of each operation as code we use Dojo together with terraform-dojo docker image and hugo-dojo docker image.
- To automate and visualize the lifecycle of the website, we execute it on GoCD pipelines.
- And finally to define the GoCD pipelines as code we use the YAML configuration plugin
Walkthrough the work
Now once we know all the components needed to setup the website deployment, we can plan the work and get busy. At the high level we must do all of these tasks:
- Build a hugo website up to the point of generating a static site.
- Setup deployment of static site to github pages. So that it is hosted at
kudulab.github.io. - Buy the domain, setup DNS zone and records, so that
kudulab.ioresolves worldwide. - Configure github pages to generate SSL certificate for
kudulab.ioand enforce https. - Configure Disqus comment section.
- Configure google analytics.
Building website with hugo
One of the benefits of hugo is a rich documentation, we can just follow the quickstart to get a minimal working website.
Setup hugo
You can follow the official guide and install hugo on your workstation and all the CI-agents.
However, we recommend a different approach - use docker and Dojo to pull a suitable docker image just before hugo is needed. Although Dojo is a topic for another post, the two biggest benefits are
- you don’t need to install hugo on your host and all CI-agents, but rather install docker and Dojo just once for all the current and future projects you may be responsible for.
- the website project we are building now will have a version-controlled reference to an exact hugo environment which is required. So even if we rerun a task a year from now, we are guaranteed, that the same tools will be used then, as now, when we got it working.
With dojo setup becomes very simple because we have already published a functional hugo-dojo docker image. At the root of our website project run
mkdir src
cd src
Then create a Dojofile:
DOJO_DOCKER_IMAGE="kudulab/hugo-dojo:1.0.0"
DOJO_DOCKER_OPTIONS="-p 1313:1313"
And run dojo.
This will pull the image and enter into docker container with hugo installed and the src directory mounted into current directory /dojo/work. You should see output like this and then interactive shell prompt:
tomzo@073c1c477b1f:~/code/public-blog2/src$ dojo
2019/04/23 19:00:00 [ 1]  INFO: (main.main) Dojo version 0.3.1
2019/04/23 19:00:00 [20]  INFO: (main.DockerDriver.HandleRun) docker command will be:
 docker run --rm -v /home/tomzo/code/public-blog2/src:/dojo/work -v /home/tomzo:/dojo/identity:ro --env-file=/tmp/dojo-environment-dojo-src-2019-04-23_19-00-00-67126061 -v /tmp/.X11-unix:/tmp/.X11-unix -p 1313:1313 -ti --name=dojo-src-2019-04-23_19-00-00-67126061 kudulab/hugo-dojo:1.0.0
23-04-2019 19:00:01 Dojo entrypoint info: Sourcing: /etc/dojo.d/variables/50-variables.sh
23-04-2019 19:00:01 Dojo entrypoint info: Sourcing: /etc/dojo.d/scripts/50-fix-uid-gid.sh
+ usermod -u 1000 dojo
usermod: no changes
+ groupmod -g 1000 dojo
+ chown 1000:1000 -R /home/dojo
23-04-2019 19:00:01 Dojo entrypoint info: dojo init finished (interactive shell)
dojo@864baf626aa5(hugodojo):/dojo/work$
Create new site
Either way, once we have hugo available, we can generate an empty site structure.
From src run:
hugo new site --force .(force is needed to ignore the existing Dojofile file)
Then, we need to choose and add the theme. If you want to manage the theme as git submodule, run this from the root of the project (not from the docker container):
git submodule add https://github.com/luizdepra/hugo-coder.git src/themes/hugo-coderThen, configure hugo to use a theme, in config.toml add the name of the theme:
theme = 'hugo-coder'We chose hugo-coder theme since it is blog-ish and nice enough. Although particularly for this theme we needed much longer configuration to start from, available on the wiki.
By now you should be able to see a live preview of the site, from the dojo docker container run:
hugo server -D --bind 0.0.0.0 --baseURL http://localhost:1313Then open http://localhost:1313 in your browser.
Since live preview is an operation we will often execute, we might as well script it.
Let’s start ./tasks bash file with the following content:
#!/bin/bash
set -e

command="$1"
case "${command}" in
  live_preview)
      cd src
      dojo "hugo server -D --bind 0.0.0.0 --baseURL http://localhost:1313"
      ;;
  *)
      echo "Invalid command: '${command}'"
      exit 1
      ;;
esac
Now we at the root of our project, we can run ./tasks live_preview and open http://localhost:1313 in the browser to work on the page content.
Generating static site
Live preview is nice for development, but our website has to be compiled into a static website before deployment. So for a more accurate preview we should setup a similar hosting environment. Let’s generate the static page:
hugo --baseUrl=http://localhost:8088This will produce public directory (in our project structure that is src/public). By now it is nice to add it to .gitignore.
We can create a minimal hosting environment using docker and Apache image, from the root of the project run:
docker run -d -p 8088:80 --name www-host -v "${PWD}/src/public":/usr/local/apache2/htdocs/ httpd:2.4.29-alpineIn the browser http://localhost:8088 should return the same page which live preview did.
We can script generating the site and creating the demo host, in our ./tasks file add:
#!/bin/bash
set -e

command="$1"
case "${command}" in
  # [...]
  demo_host)
      docker run -d -p 8088:80 --name www-host\
        -v "${PWD}/src/public":/usr/local/apache2/htdocs/\
        httpd:2.4.29-alpine
      ;;
  cleanup)
      docker stop www-host; docker rm www-host
      ;;
  generate)
      if [[ -z "${KUDU_ENVIRONMENT}" ]]; then
        echo "KUDU_ENVIRONMENT is not set"
        exit 1
      fi
      # baseUrl in static page for production is different than for testing
      if [[ "${KUDU_ENVIRONMENT}" == "testing" ]]; then
        base_url="//localhost:8088/"
      elif [[ "${KUDU_ENVIRONMENT}" == "production" ]]; then
        base_url="https://kudulab.github.io/"
      else
        echo "Unsupported KUDU_ENVIRONMENT=${KUDU_ENVIRONMENT}, exit 1"
        exit 1
      fi
      cd src
      rm -rf public/*
      dojo "hugo --baseUrl=${base_url}"
      ;;
  *)
      echo "Invalid command: '${command}'"
      exit 1
      ;;
esac
To play nice, we should automate the process of testing if hosted website actually has the expected content. In a larger website project we could implement stronger tests with selenium or alike framework. For the purposes of this blog, we perform a simple smoke test, using curl and checking for the unique pieces of the page. We use bats to implement the simple test:
test/integration/bats/test.bats
load '/opt/bats-support/load.bash'
load '/opt/bats-assert/load.bash'

@test "home page is available" {
  run /bin/bash -c "curl -i -L localhost:8088"
  assert_output --partial "200 OK"
  assert_output --partial "<title>KuduLab</title>"
  assert_output --partial "Home"
  assert_output --partial "Projects"
  assert_output --partial "About"
  assert_equal "$status" 0
}
The test can be scripted in ./tasks, add a test task:
  test)
      bats "$(pwd)/test/integration/bats"
      ;;
Then we can start running generate and test on a GoCD pipeline to make sure it still works while we introduce changes.
At the root of our project create pipeline.gocd.yaml
format_version: 4
pipelines:
  public-blog:
    group: www
    label_template: "${git[:8]}"
    materials:
      git:
        type: configrepo
    stages:
      - test:
          clean_workspace: true
          environment_variables:
            KUDU_ENVIRONMENT: testing
          jobs:
            test:
              # depending on your setup, either change the elastic_profile_id or use resources
              elastic_profile_id: w.c1.m1024.e5
              tasks:
                - exec:
                    command: /bin/bash
                    arguments:
                      - -c
                      - ./tasks generate
                - exec:
                    command: /bin/bash
                    arguments:
                      - -c
                      - ./tasks demo_host
                - exec:
                    command: /bin/bash
                    arguments:
                      - -c
                      - ./tasks test
                - exec:
                    run_if: any
                    command: /bin/bash
                    arguments:
                      - -c
                      - ./tasks cleanup
By now we should have committed all files and pushed to git server. Then to finish the pipeline setup, we should add configuration repository to the GoCD server using the documented steps.
Deployment to github pages
Github pages deployments are very simple - we just need to commit and push our static site to a repository with a magic name.
We are building a personal blog, initially to be hosted at kudulab.github.io, therefore we must create a github repository named kudulab.github.io.
We already have a task to generate the production site, which produces static site in src/public.
KUDU_ENVIRONMENT=production ./tasks generateSo in order to deploy it, we only need to commit all the generated content into second repository kudulab.github.io and push it to github, which will trigger github hosting to update content on https://kudulab.github.io.
We can automate this operation in the ./tasks script:
publish)
    git_ref=$(git log -1 --pretty='format:%H')
    git clone git@github.com:kudulab/kudulab.github.io.git kudulab.github.io
    cd kudulab.github.io
    for a_file in *; do
      rm -rf "${a_file}"
    done
    cp -r ../src/public/* .
    git add .
    git commit -m "generated from git ref: ${git_ref}" || true
    git push
    ;;
Therefore the entire generate and publish procedure can be executed with
KUDU_ENVIRONMENT=production ./tasks generate
./tasks publish
Above 2 steps can be added as a stage in the GoCD pipeline:
- publish:
    clean_workspace: true
    environment_variables:
      KUDU_ENVIRONMENT: production
    jobs:
      publish:
        elastic_profile_id: w.c1.m1024.e5
        tasks:
          - exec:
              command: /bin/bash
              arguments:
                - -c
                - ./tasks generate
          - exec:
              command: /bin/bash
              arguments:
                - -c
                - ./tasks publish
Versioning and releases
It is technically possible to deploy site on each commit. However we prefer to publish only such content, which was previously released with changes documented in the changelog. For that purpose, we have published releaser - a set of common bash functions to help with managing the changelog and git releases.
To start using the releaser, at the top of ./tasks file add:
RELEASER_VERSION="2.1.0"
RELEASER_FILE="ops/releaser-${RELEASER_VERSION}"

mkdir -p ops
if [[ ! -f $RELEASER_FILE ]];then
  wget --quiet -O $RELEASER_FILE https://github.com/kudulab/releaser/releases/download/${RELEASER_VERSION}/releaser
fi
source $RELEASER_FILE
There are 2 useful operations we can add in ./tasks
set_version)
    releaser::bump_changelog_version "$2" "$3"
    ;;
release)
    releaser::verify_release_ready
    releaser::git_tag_from_changelog
    ;;
We can use ./tasks set_version 0.1.0 to manage the version and release date the top of the changelog and ./tasks release to add git tag to the repository with the version from top of the changelog.
To cut our first release, we should initialize a changelog.
touch CHANGELOG.md
./tasks set_version 0.1.0
This should produce output like:
24-04-2019 09:43:01 RELEASER info: New version will be: 0.1.0
24-04-2019 09:43:01 RELEASER info: Bumped to 0.1.0 in CHANGELOG.md
We should now document changes we have made in the project since last release, in case of our first release, the changelog could look like this:
### 0.1.0 (2019-Apr-15)

Initial release, empty site deployed to kudulab.github.io
The last step, before deployment would be to add automated code releases to the GoCD pipeline. It is enough to add ./tasks release in release stage.
The pipeline YAML should look like this by now:
format_version: 4
pipelines:
public-blog:
group: www
label_template: "${git[:8]}"
materials:
git:
type: configrepo
stages:
- test:
clean_workspace: true
environment_variables:
KUDU_ENVIRONMENT: testing
jobs:
test:
elastic_profile_id: w.c1.m1024.e5
tasks:
- exec:
command: /bin/bash
arguments:
- -c
- ./tasks generate
- exec:
command: /bin/bash
arguments:
- -c
- ./tasks demo_host
- exec:
command: /bin/bash
arguments:
- -c
- ./tasks test
- exec:
run_if: any
command: /bin/bash
arguments:
- -c
- ./tasks cleanup
- release:
clean_workspace: true
jobs:
code:
elastic_profile_id: w.c1.m1024.e5
tasks:
- exec:
command: /bin/bash
arguments:
- -c
- ./tasks release
- publish:
clean_workspace: true
environment_variables:
KUDU_ENVIRONMENT: production
jobs:
publish:
elastic_profile_id: w.c1.m1024.e5
tasks:
- exec:
command: /bin/bash
arguments:
- -c
- ./tasks generate
- exec:
command: /bin/bash
arguments:
- -c
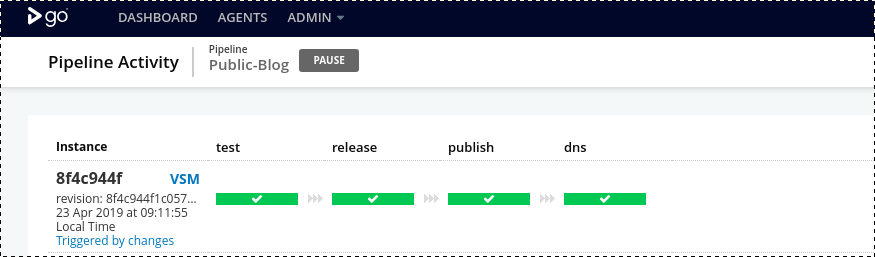
- ./tasks publishNow we can commit and push, then watch the pipeline running the release and deployment.
When we visit kudulab.github.io the page should be there.
Domain and DNS setup
Often when choosing domain name registrar we also get access to a DNS server. For our purposes, it is important that we can access DNS as a service over HTTP API and preferably there is a terraform provider for it. Unoriginally, we went with AWS Route 53, which is well documented and supported by the terraform AWS provider.
Install terraform
You can install terraform and AWS plugin yourself or leverage Dojo and the terraform-dojo docker image:
We will manage infrastructure (the DNS records) from terraform directory:
mkdir -p terraformTo declare which terraform-dojo docker image to use, we create a Dojofile
DOJO_DOCKER_IMAGE="kudulab/terraform-dojo:1.0.2"Then run dojo to enter a container with terraform and several plugins installed.
Provision DNS
We start with buying the domain using AWS management console. The process is quite straightforward. You need an AWS account, then login to the management console, go to route53 and click on big blue button “Register Domain”.
Once you are done with purchasing the domain, there will be a DNS zone created already, which you can see in Hosted zones. Notice the Hosted Zone ID, which is visible on the screenshot below:

Github pages documentation is very helpful in guiding us through the process of DNS setup. Since we are building a website on an apex domain, we cannot simply create a CNAME record from kudulab.io to kudulab.github.io.
Instead we will provision DNS A records so that kudulab.io resolves into IPs of github pages load balancer. These are specified in the github pages documentation.
We declare the desired infrastructure in dns.tf terraform file:
# root zone was created externally,
# we don't manage the zone in infra of the blog
# because zone is shared by many services
variable "root_zone_id" {
  default = "Z1B6OG086ITGV2"
}

# Configure the AWS Provider
provider "aws" {
  # You can provide your credentials via
  # the AWS_ACCESS_KEY_ID and AWS_SECRET_ACCESS_KEY, environment variables
  region     = "us-east-1"
}

# List of IPs on https://help.github.com/en/articles/setting-up-an-apex-domain#configuring-a-records-with-your-dns-provider
resource "aws_route53_record" "www" {
  zone_id = "${var.root_zone_id}"
  name    = "kudulab.io"
  type    = "A"
  ttl     = 3600
  records = [
    "185.199.108.153",
    "185.199.109.153",
    "185.199.110.153",
    "185.199.111.153"
  ]
}
A typical workflow with terraform is
- terraform init to perform initialization in current directory and optional backend
- terraform plan which compares current infrastructure state to the desired one, which we defined in
*.tffiles. It can output a plan file with actions to take. - terraform apply which if used with a plan file, will execute previously planned actions.
So in the simplest form, to create our infrastructure we would run:
terraform init
terraform plan -out="deployment.tfplan"
terraform apply deployment.tfplan
However, particularly in our infrastructure we use consul as backend for terraform state store and we use HashiCorp Vault to provide AWS authentication credentials. With GoCD usage of vault is not necessary, you could alternatively use a secure environment variables to encrypt the AWS_SECRET_ACCESS_KEY and then place the value in gocd yaml.
To encrypt the secret, you can use curl:
curl 'https://ci.example.com/go/api/admin/encrypt' \
  -u 'username:password' \
  -H 'Accept: application/vnd.go.cd.v1+json' \
  -H 'Content-Type: application/json' \
  -X POST -d '{
    "value": "<your secret access key>"
  }'
The server will respond with
{
  "_links" : {
    "doc" : {
      "href" : "https://api.gocd.org/#encryption"
    },
    "self" : {
      "href" : "https://ci.example.com/go/api/admin/encrypt"
    }
  },
  "encrypted_value" : "AES:GUkf7B+eai1yfcpOWfdtJQ==:2cOCnJtg2HD4eJOrVGXHEN6c/q8RYZyfebVLDCbP+JY="
}
Then in GoCD yaml add the encrypted_value to secure_variables at stage or job level:
secure_variables:
  AWS_SECRET_ACCESS_KEY: "AES:GUkf7B+eai1yfcpOWfdtJQ==:2cOCnJtg2HD4eJOrVGXHEN6c/q8RYZyfebVLDCbP+JY="
Converging DNS can be scripted in ./tasks file with the following snippet:
function tf_ops {
  operation=$1

  cd terraform/
  terraform init -backend-config path=terraform/kudu-www
  if [[ "${operation}" == "create" ]]; then
    terraform plan -out="kudu_deployment.tfplan"
  elif [[ "${operation}" == "destroy" ]]; then
    terraform plan -out="kudu_deployment.tfplan" -destroy
  fi
  terraform apply kudu_deployment.tfplan
}

command="$1"
case "${command}" in
  _set_dns)
      tf_ops "create"
      ;;
  set_dns)
      # AWS_ACCESS_KEY_ID and AWS_SECRET_ACCESS_KEY from vault
      export AWS_ACCESS_KEY_ID=$(read_from_vault_or_die "aws" "access_key_id")
      export AWS_SECRET_ACCESS_KEY=$(read_from_vault_or_die "aws" "secret_access_key")
      dojo -c terraform/Dojofile "./tasks _set_dns"
      ;;
# [...]
esac
The user identified with AWS_ACCESS_KEY_ID must have sufficient permissions to change DNS resources in AWS. For example you can use the AWS managed policy AmazonRoute53FullAccess.
With such setup, we can idempotently provision DNS records with ./tasks set_dns.
The last point would be to setup this step on a GoCD pipeline. We can add one more stage in pipeline.gocd.yaml:
- dns:
    clean_workspace: true
    environment_variables:
      KUDU_ENVIRONMENT: production
    secure_variables:
      VAULT_TOKEN: "AES:bYwjpIz02AtPshnMBaBdnA==:BwACwa5fWInrHU2xXfyJlM2qFKk2lE9g+d5gGAFTl3sjg/sLdJqDfKW3Qki4vwfH"
    jobs:
      provision:
        elastic_profile_id: w.c1.m1024.e5
        tasks:
          - exec:
              command: /bin/bash
              arguments:
                - -c
                - ./tasks set_dns
After dns stage completes, we may need to wait a moment before DNS records propagate around the world, a nice tool to watch the progress is available at https://dnschecker.org
Configure custom domain on github pages
Several changes are required in our tasks script to make github pages serve page from https://kudulab.io rather than https://kudulab.github.io.
- We need to update
baseUrlwhen generating the production static site. - We need to commit
CNAMEat the root of github pages repository with our domain name -kudulab.io. This will configure github load balancer to serve a page forkudulab.ioand it will trigger re-generation of the SSL certificate forkudulab.io. - To ensure that
httpsis always used, we need to edit settings on github and check “Enforce HTTPS”.
The generate and publish tasks should look like this now:
generate)
    if [[ -z "${KUDU_ENVIRONMENT}" ]]; then
      echo "KUDU_ENVIRONMENT is not set"
      exit 1
    fi
    # baseUrl in static page for production is different than for testing
    if [[ "${KUDU_ENVIRONMENT}" == "testing" ]]; then
      base_url="//localhost:8088/"
    elif [[ "${KUDU_ENVIRONMENT}" == "production" ]]; then
      base_url="https://kudulab.io/"
    else
      echo "Unsupported KUDU_ENVIRONMENT=${KUDU_ENVIRONMENT}, exit 1"
      exit 1
    fi
    cd src
    rm -rf public/*
    dojo "hugo --baseUrl=${base_url}"
    ;;
publish)
    git_ref=$(git log -1 --pretty='format:%H')
    git clone git@github.com:kudulab/kudulab.github.io.git kudulab.github.io
    cd kudulab.github.io
    # remove everything but for .git directory
    for a_file in *; do
      rm -rf "${a_file}"
    done
    cp -r ../src/public/* .
    echo "kudulab.io" > CNAME
    git add .
    git commit -m "generated from git ref: ${git_ref}" || true
    git push
    ;;
Configure Disqus
It is a very simple process - setup an account on https://disqus.com/ and configure a new site in the disqus admin panel. This will provide you with a site ID.
Then in hugo, we just need to add the ID in src/config.toml
disqusShortname = "your-id"Configure google analytics
Also a simple process, you register a site on google, which provides you with an ID.
Then in hugo, we just need to add the ID in src/config.toml
googleAnalytics = "your-id"Summary
Starting from nothing, we have built a website with code, infrastructure and operations checked-in the source control.
Now any changes can be introduced to production by git commits and running git push and watching GoCD pipeline deploying the site:
While it may seem like an overkill to apply all of these efforts for a simple website, we find that this set of practices is very resilient to external changes because we have locked version of practically every dependency of this project. In this repository we have nearly every piece which makes the website work and controls its lifecycle, this makes maintenance straightforward and project easier to share.
Feel free to comment and ask questions, we’ll certainly engage with you.
References
I have found following sites useful when working on this setup:
- https://zwbetz.com/make-a-hugo-blog-from-scratch/ - nice overview of elements of hugo theme. Useful if you want to hack with the theme or create your own.
- https://aws.amazon.com/route53/faqs/ - Amazon AWS Route 53 FAQ
- IAM Best Practices
- Hugo documentation on hosting with github pages